Smart Garage Door Opener
Introduction
Overview
Control your garage door from your phone anytime, anywhere! With the Smart Garage Door Opener, you can also use Alexa and Google Assistant to open and close your garage door on any smartphone/tablet
Inside the box you'll find

Specifications
- Smart Wall Adaptor: Input: 100-240Vac 50/60Hz 0.15A max
- Smart Garage Door Opener: Input: 5Vdc/1A
Compatibility
The Atomi Smart Garage Door Opener can be installed to control most garage door openers.
Click here to be sure yours qualifies.
Before you begin
1. Know your Wi-Fi network and password
2. Make sure your mobile device is running iOS® 8 or higher or Android™ 4.1× or higher
3. Make sure you’re connected to a 2.4GHz Wi-Fi network (Atomi Smart can’t connect to 5GHz networks).
Initial Setup

1. Bring the Smart Garage Door Opener close to your router
2. Slide and remove the backing of the Smart Garage Door Opener

3. Plug the micro-USB cable into the Smart Garage Door Opener and slide the backing back on
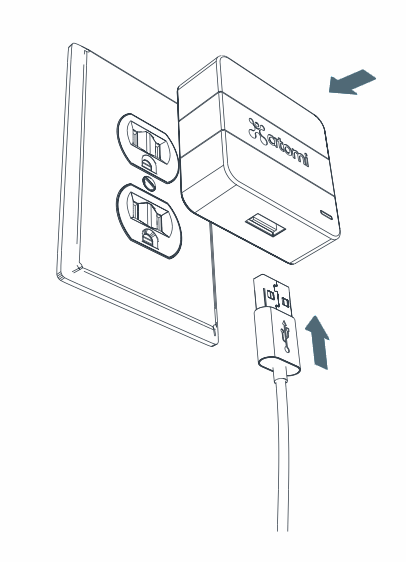
4. Plug the USB into the Smart Wall Adaptor and plug the Smart Wall Adaptor into your wall outlet
Connecting Your Device
Step 1: Download App
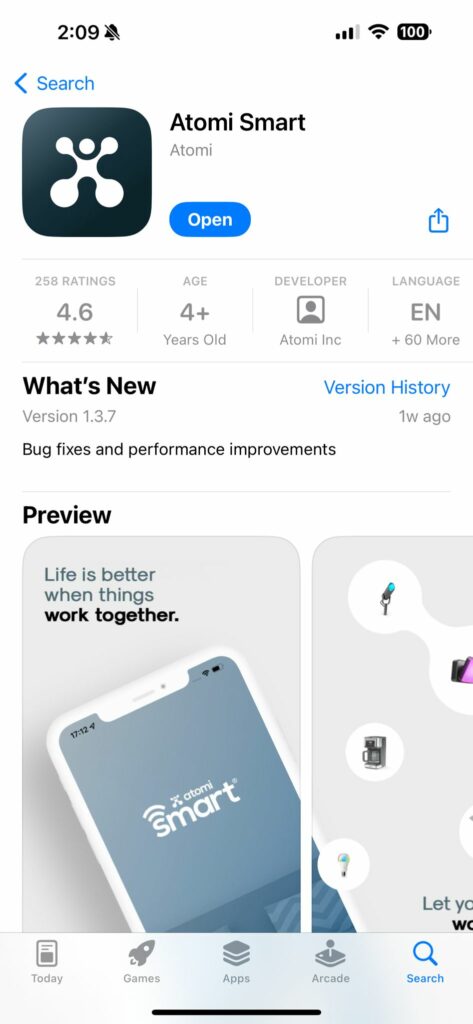
Download the Atomi Smart app from the App Store or Google Play and create an account. If you already have the app installed, please make sure to check for any updates as they will improve your experience with the Atomi Smart app.
Step 2: Adding Your Device

1. Select “Add Device” or click (+) at the top right corner of the screen.
2. Select “Smart Garage Door Opener” from the device list.
Step 3: Connecting to Wi-Fi
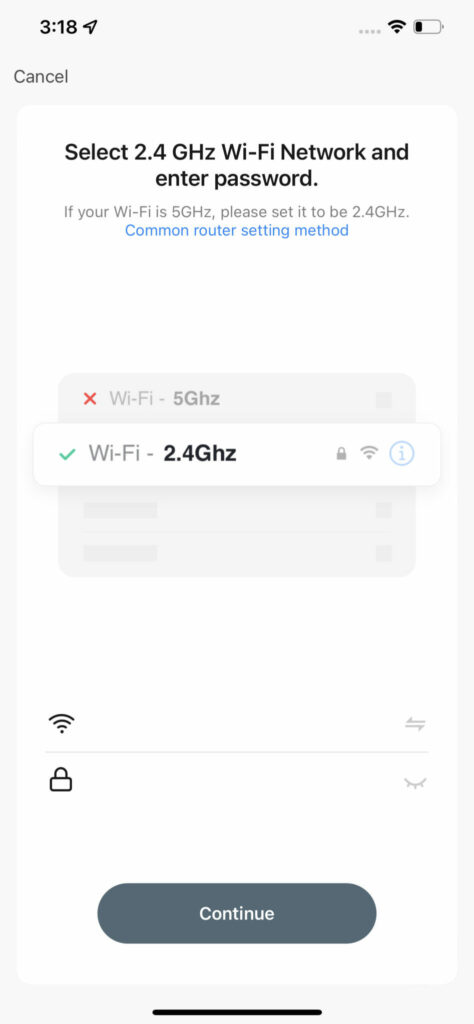
1. Enter your Wi-Fi network (2.4 GHz only) and password
2. Press ‘Continue’
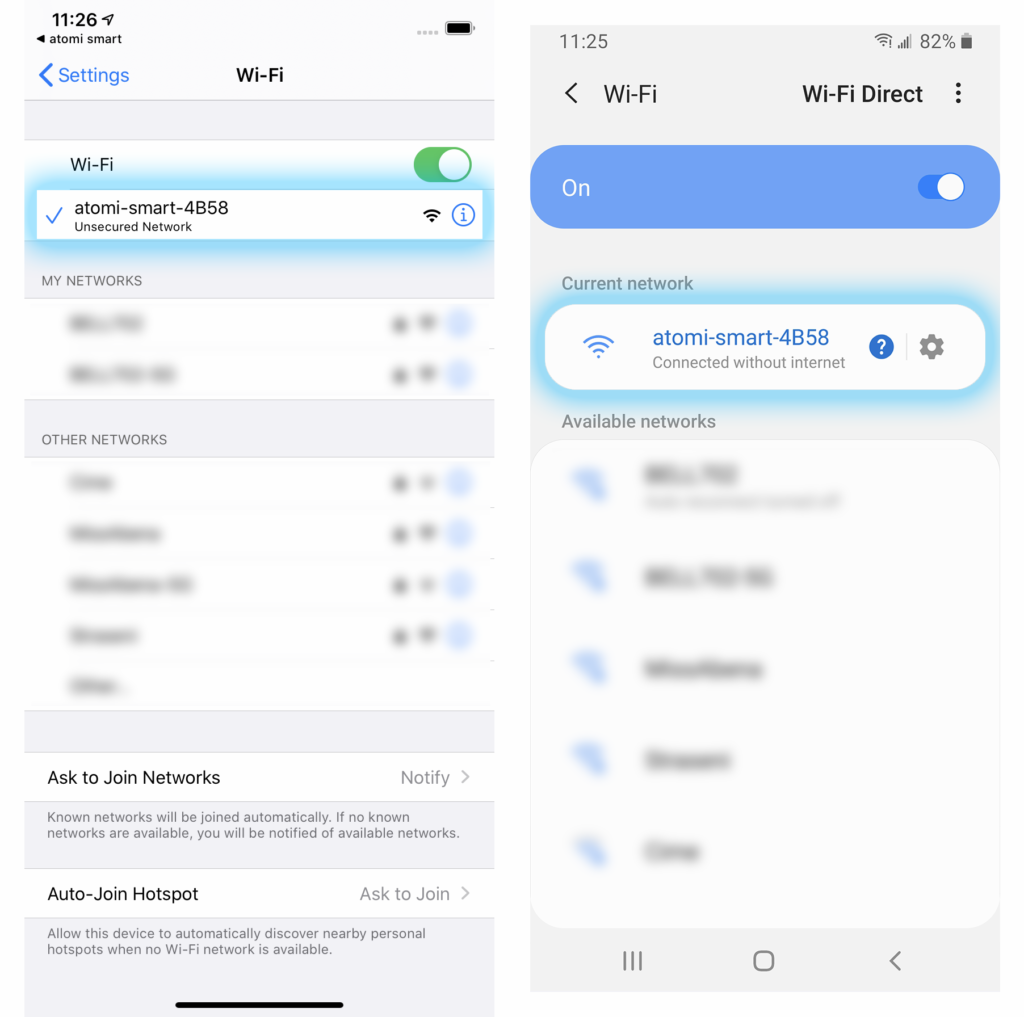
Step 4: Connecting Your Device
1. Confirm that the blue indicator light is flashing. If not, press and hold the Wi-Fi button for 10 seconds or unplug and plug the device again.
2. Press ‘Continue’
3. Read the instructions on your phone screen and press ‘Go to Connect’
4. On your phone’s Wi-Fi screen, select ‘atomi-smart-xxxx’
5. Once it connects, return to the Atomi Smart app and wait for the installation to be completed
iOS: After connecting to the atomi-smart-xxxx, return to the app by pressing ‘Atomi Smart’ on the top left part of the screen, or by switching back to the Atomi Smart window
Android: After connecting to the atomi-smart-xxxx, some devices may display a message informing that you are “Connected without internet”. Please ignore this message and return to the app by pressing the back button on the bottom navigation bar (Do not press the back button on the top left part of the screen as this may bring you back to the ‘Settings’ page instead of the Atomi Smart app)
Your device is now connected!
IMPORTANT: If you cannot see the ‘atomi-smart-xxxx’, press and hold the Wi-Fi button again for another 10 seconds and refresh your Wi-Fi list. The ‘atomi-smart-xxxx’ network should appear after a few seconds.
NOTE: If you still cannot see the atomi-smart-xxxx on your list, you may have an older model of our smart product that will require you to press and hold the Wi-Fi button another time until it starts blinking slowly.
Installation

1. Now that you have initiated a Wi-Fi connection, unplug the Smart Power Adaptor from the outlet and bring the Smart Garage Door Opener to your garage
2. Locate your existing garage door opener panel and loosen it from the wall. Your garage door opener panel should now be hanging and you should be able to see the module at the back of it.
3. Connect the white and red wires running from the Smart Garage Door Opener to the corresponding screw on the back of your garage door opener panel i.e. white to white and red to red
4. Secure the garage door opener panel back to the wall and position your Smart Garage Door Opener right above it
5. Use the screws included in your product packaging to secure the Smart Garage Door Opener’s backing onto the wall
6. Plug the Smart Power Adaptor into your desired wall outlet
7. Adjust and position the camera on your Smart Garage Door Opener and test the view on the Atomi Smart app to make sure you are happy with the facing angle
8. Testing the device:
a) Open the app, choose “Smart Garage Door Opener” and press the light icon button. Check if the device light is turning ON/OFF.
b) Press the camera icon button. You should receive a notification with the captured photo.
c) Slide up the switch to open your garage door. Check if your garage door is opening.
d) Slide down the switch to close your garage door. Check if your garage door is opening.

Controlling your Smart Garage Door Opener

Garage Door Illustration – Shows the current status of your garage door
Switch – Slide Up/Down to Open and Close your garage door
Light – Turns camera light ON/OFF on the device
Camera – Capture a photo of your garage door
Schedule – Set schedules to Open/Close your garage door
Countdown – Set a countdown to Open/Close your garage door
Activity – View recently captured photos of your garage door
Resync – Manually adjusts door status
Schedule

Time – Select the time to run the schedule
Repeat – Select what days of the week to repeat the schedule
Note – Adds a note/label to the schedule
Notification – Enable to receive a notification every time the schedule runs
Activate Garage Door – Confirms that the Schedule will open/close your garage door (Always ON)
More information about Creating Schedules is available here
You can also use automations to create additional schedules. Click here to learn more.
Countdown

Set a countdown to Open/Close your garage door
Activity

View recently captured photos of your garage door
FAQ & Troubleshooting
Alexa
“Alexa, turn on [device name]”
“Alexa, activate [device name]”
Google Assistant
“Hey Google, turn on [device name]”
“Hey Google, activate [device name]”
In order to successfully connect Atomi Smart devices, a 2.4GHz connection is required.
The 2.4GHz frequency waves travel further than the 5GHz. This means that if your device is in another room or far from your phone, you will have a better signal reception (compared to 5Ghz) which is essential for your smart device to function correctly and stay online.
All modern routers come with 2.4GHz and 5GHz. Depending on your router type, these bands may appear as separate WiFi networks (Example: Name-2.4GHz and Name-5GHz) or combined. If you only have one WiFi network, you should still be able to connect since the Atomi Smart app automatically finds the 2.4GHz frequency when connecting to your router.
However, if you experience any issues, please follow the points below:
– Make sure that you are connecting to a 2.4GHz network
– Keep your mobile device close to the router during connection
– If you have two SSID for your WiFi (Example: Name-2.4GHz / Name-5GHz), please temporarily disable “Auto-Join” on your Name-5GHz network)
– If you have two SSID for your WiFi, make sure that your 2.4GHz and 5GHz WiFi have different names
– If your router gives the option to disable the 5GHz network, please disable it temporarily
– Disable any VPN apps/services in order to connect successfully
– If you are having issues to connect, turn on Airplane Mode (Keep only WiFi activated when connecting your smart device)
– Make sure that you’ve entered the correct password for your 2.4GHz WiFi on the “Select 2.4GHz Wi-Fi Network” screen (Case sensitive, and make sure that there are no extra spaces)
– If you have too many devices connected to your 2.4GHz (more than 10), please turn off some of them temporarily and retry connecting your smart device to the app
– If you have a Mesh router, you may not be able to manually switch to a 2.4GHz frequency. Since this frequency travels further than the 5GHz, you can force your device to connect to it by moving your phone far from the router
– If you are still experiencing issues to connect, delete the app and reinstall it
– If the issue persists, restart your router
Make sure your Atomi Smart device is plugged in and the Wi-Fi light is blinking. If not, unplug your Atomi Smart device and plug it back in to reboot. If you still cannot see the ‘atomi-smart-xxxx’, press and hold the Wi-Fi button for 10 seconds. Note: For older devices, you may be required to press and hold the Wi-Fi button again for another 10 seconds. The atomi-smart-XXXX should appear on your network list after a few seconds.
Use your smart phone to confirm that you have at least two Wi-Fi bars in the vicinity of your Atomi Smart device. If not, move your Atomi Smart device closer to your router. (The list will refresh every 10 seconds)
Make sure you entered the correct WiFi password during the WiFi setup. Check if there are problems with your internet connection. If the WiFi signal is too weak, reset your WiFi router and try again.
Refresh the device list.
Force quit and re-launch the Atomi Smart app.
Press and hold the Wi-Fi butt on for 10 seconds.
Check that the red and white wires running from the Smart Garage Door Opener are properly connected to the garage door opener panel. Make sure each wire corresponds to its respective color on the module at the back of the garage door opener panel i.e red to red and white to white.
Wi-Fi networks come in a lot of shapes and sizes with many quirks of their own. It doesn’t mean your Atomi Smart device is malfunctioning.
If problems persist, please try these steps, in this order:
1. Force quit and re-launch the Atomi Smart app. Check to see if this fixes the issue.
2. Unplug your Atomi Smart device and plug it back in. Check to see if this fixes the issue.
3. Unplug your router and plug it back in. Check to see if this fixes the issue.
4. Delete and reinstall the Atomi Smart app. Check to see if this fixes the issue.
Click here to see all models that are compatible with the Smart Garage Door Opener
On the Atomi Smart app, go to Me > Settings > Push Notifications and slide the bar to turn on push notifications.
The Atomi Smart Garage Door Opener user guide is available here
Still have questions?
Create a ticket on our Support page. Our team is available to help, Monday through Friday, 9am to 5pm (EST)