Smart Aroma Diffuser
Introduction
Overview
Designed to fill the air with fragrance and moisture, the Atomi Smart Aroma Diffuser is a perfect tool for aromatic relaxation. Just add a few drops of your favorite essential oil with water in the tank and unwind. Control the Smart Aroma Diffuser from anywhere at any time using your smartphone.
Specifications
Power Supply Input: 100-240V~50/60Hz 0.4A Max – Output: 24V = 500mA
Smart Aroma Diffuser Input: 24V = 500mA
Working Frequency: 2.4Mhz
Tank Capacity: 250ML (AT1359) /400ML (AT1325)
Watts: 12W
Before you begin
1. Know your Wi-Fi network and password
2. Make sure your mobile device is running iOS® 8 or higher or Android™ 4.1× or higher
3. Make sure you’re connected to a 2.4GHz Wi-Fi network (Atomi Smart can’t connect to 5GHz networks).
Connecting Your Device
Step 1: Download App
Download the Atomi Smart app from the App Store or Google Play and create an account. If you already have the app installed, please make sure to check for any updates as they will improve your experience with the Atomi Smart app.
Step 2: Adding Your Device

1. Select “Add Device” or click (+) at the top right corner of the screen.
2. Choose “Smart Aroma Diffuser” from the device list.
Step 3: Connecting to Wi-Fi
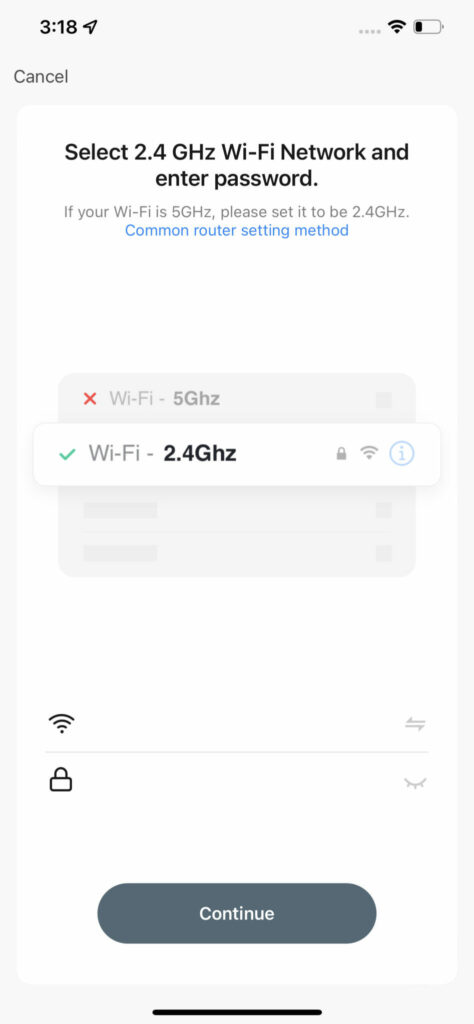
1. Enter your Wi-Fi network (2.4 GHz only) and password
2. Press ‘Continue’
Step 4: Plug In
Plug your Atomi Smart Aroma Diffuser into any standard outlet.
Step 5: Add Water

Using the measuring cup, carefully add cool water to the reservoir. Add desired essential oils to the water tank.
Note: Do not exceed the maximum level. Do not add water while the diffuser is on.
Step 6: Connecting Your Device
1. Confirm that the Wi-Fi indicator light is still flashing. If not, press and hold the power button for 10 seconds. The blue indicator light should start flashing.
2. Press ‘Continue’
3. Read the instructions on your phone screen and press ‘Go to Connect’
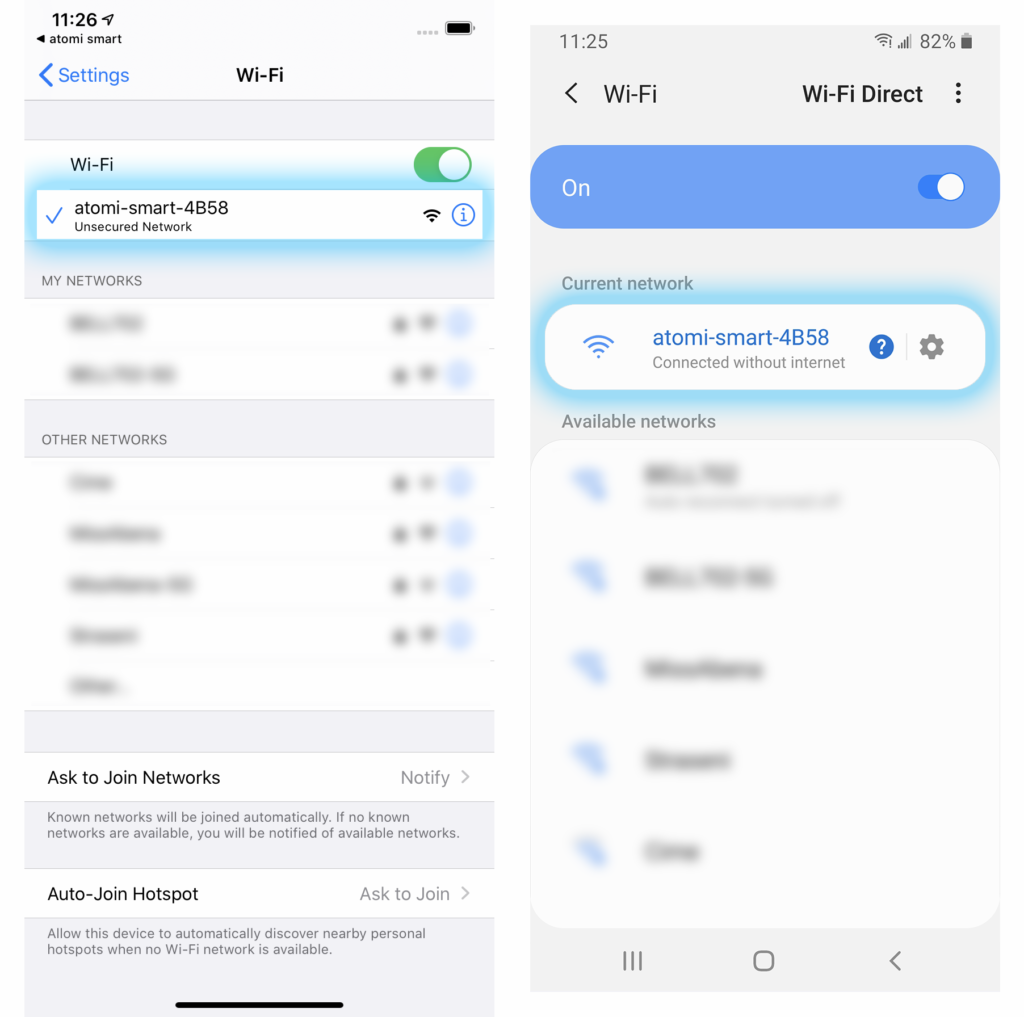
4. On your phone’s Wi-Fi screen, select ‘atomi-smart-xxxx’
5. Once it connects, return to the Atomi Smart app and wait for the installation to be completed
iOS: After connecting to the atomi-smart-xxxx, return to the app by pressing ‘Atomi Smart’ on the top left part of the screen, or by switching back to the Atomi Smart window
Android: After connecting to the atomi-smart-xxxx, some devices may display a message informing that you are “Connected without internet”. Please ignore this message and return to the app by pressing the back button on the bottom navigation bar (Do not press the back button on the top left part of the screen as this may bring you back to the ‘Settings’ page instead of the Atomi Smart app)
Your device is now connected!
IMPORTANT: If you cannot see the ‘atomi-smart-xxxx’, press and hold the Wi-Fi button again for another 10 seconds and refresh your Wi-Fi list. The ‘atomi-smart-xxxx’ network should appear after a few seconds.
NOTE: If you still cannot see the atomi-smart-xxxx on your list, you may have an older model of our smart product that will require you to press and hold the Wi-Fi button another time until it starts blinking slowly.
Controlling your Smart Aroma Diffuser
Smart Aroma Diffuser (AT1359)

ON/OFF – Press ‘Power’ to turn ON/OFF your Smart Aroma Diffuser
Intensity – Press the ‘Spray’ button or the diffuser illustration to change Spray intensity
Spray Timer

Sets a countdown to shut off spray
Schedule

Sets weekly schedules to fit your lifestyle. (Image above)
Power – Select if the schedule should turn ON or OFF your Aroma Diffuser
Spray – Select the intensity of the spray
You can also use automations to create additional schedules. Click here to learn more.
Smart Aroma Diffuser with LED Color (AT1325)

ON/OFF – Press ‘Power’ to turn ON/OFF your Smart Aroma Diffuser
Intensity – Press the Diffuser illustration to change Spray intensity
Light – Customize your Smart Aroma Diffuser colors
Timer

Sets a countdown to shut off spray
Gradient

Press to activate auto gradient light preset
Fixed

Select to change and adjust LED color
Nightlight

Press to activate Nightlight LED preset
Schedule

Sets weekly schedules to fit your lifestyle.
Select ‘Power’ to set a schedule to turn on/off your device
Select ‘Spray’ to set a schedule to turn on/off the spray
Select ‘Light’ to set a schedule to turn on/off the light
It’s recommended to create a schedule for each item (Power, Spray, Light) which allows you to run schedules with multiple actions at the same time.
You can also use automations to create additional schedules. Click here to learn more.
Cleaning and Maintaining your Smart Aroma Diffuser
CAUTION: Always be sure the Smart Aroma Diffuser is switched OFF, unplugged before cleaning or attempting to store the item.
Care and Cleaning: After using 5-6 times, or 3-5 days, please clean the product as follow:
- Unplug the unit from the power supply and remove the cover
- Pour out any remaining water from the tank
- Add a small amount of warm dish detergent, and wipe it gently, then use a cleaning cloth to dry it
- Pour the water away from the air outlet
- Do not use other acids or enzyme detergents, as this may give off hazardous gas or cause malfunction
- If the diffuser is not used for an extended period, drain water from the reservoir and allow it to dry. Before using, clean the reservoir with a mild detergent
Storing: Allow the Smart Aroma Diffuser to dry off completely before storing. Store in a dry location. Do not place heavy items on top of the Smart Aroma Diffuser during storage as this may result in possible damage.
FAQ & Troubleshooting
Alexa
“Alexa, turn on [device name]”
“Alexa, turn off [device name]”
“Alexa, set the [device name] light to blue” (Only available on AT1325 model)
Google Assistant
“Hey Google, turn on [device name]”
“Hey Google, turn off [device name]”
“Hey Google, set the [device name] light to blue” (Only available on AT1325 model)
In order to successfully connect Atomi Smart devices, a 2.4GHz connection is required.
The 2.4GHz frequency waves travel further than the 5GHz. This means that if your device is in another room or far from your phone, you will have a better signal reception (compared to 5Ghz) which is essential for your smart device to function correctly and stay online.
All modern routers come with 2.4GHz and 5GHz. Depending on your router type, these bands may appear as separate WiFi networks (Example: Name-2.4GHz and Name-5GHz) or combined. If you only have one WiFi network, you should still be able to connect since the Atomi Smart app automatically finds the 2.4GHz frequency when connecting to your router.
However, if you experience any issues, please follow the points below:
– Make sure that you are connecting to a 2.4GHz network
– Keep your mobile device close to the router during connection
– If you have two SSID for your WiFi (Example: Name-2.4GHz / Name-5GHz), please temporarily disable “Auto-Join” on your Name-5GHz network)
– If you have two SSID for your WiFi, make sure that your 2.4GHz and 5GHz WiFi have different names
– If your router gives the option to disable the 5GHz network, please disable it temporarily
– Disable any VPN apps/services in order to connect successfully
– If you are having issues to connect, turn on Airplane Mode (Keep only WiFi activated when connecting your smart device)
– Make sure that you’ve entered the correct password for your 2.4GHz WiFi on the “Select 2.4GHz Wi-Fi Network” screen (Case sensitive, and make sure that there are no extra spaces)
– If you have too many devices connected to your 2.4GHz (more than 10), please turn off some of them temporarily and retry connecting your smart device to the app
– If you have a Mesh router, you may not be able to manually switch to a 2.4GHz frequency. Since this frequency travels further than the 5GHz, you can force your device to connect to it by moving your phone far from the router
– If you are still experiencing issues to connect, delete the app and reinstall it
– If the issue persists, restart your router
Make sure your Atomi Smart device is plugged in and the Wi-Fi light is blinking. If not, unplug your Atomi Smart device and plug it back in to reboot. If you still cannot see the ‘atomi-smart-xxxx’, press and hold the Wi-Fi button for 10 seconds. Note: For older devices, you may be required to press and hold the Wi-Fi button again for another 10 seconds. The atomi-smart-XXXX should appear on your network list after a few seconds.
Use your smart phone to confirm that you have at least two Wi-Fi bars in the vicinity of your Atomi Smart device. If not, move your Atomi Smart device closer to your router. (The list will refresh every 10 seconds).
Make sure you entered the correct WiFi password during the WiFi setup. Check if there are problems with your internet connection. If the WiFi signal is too weak, reset your WiFi router and try again.
Refresh the device list.
Force quit and re-launch the Atomi Smart app.
Check to see if there’s enough water in the tank. If not use the measuring cup to fill tank with appropriate amount of water. Make sure the plug is fully inserted into the bottom of the base
1. Verify the water level. The unit shuts to automatically when the water level is too low as a safety feature
2. Make sure nothing is blocking the Mist Output
3. Check the fan vent on the bottom of the base is not blocked
4. Empty and rinse the water reservoir with cool tap water
Press and hold the Wi-Fi butt on for 10 seconds.
Wi-Fi networks come in a lot of shapes and sizes with many quirks of their own. It doesn’t mean your Atomi Smart device is malfunctioning.
If problems persist, please try these steps, in this order:
1. Force quit and re-launch the Atomi Smart app. Check to see if this fixes the issue.
2. Unplug your Atomi Smart device and plug it back in. Check to see if this fixes the issue.
3. Unplug your router and plug it back in. Check to see if this fixes the issue.
4. Delete and reinstall the Atomi Smart app. Check to see if this fixes the issue.
Still have questions?
Create a ticket on our Support page. Our team is available to help, Monday through Friday, 9am to 5pm (EST)