Smart Coffee Maker
If you are having issues connecting your Smart Coffee Maker, please follow the steps below.
1. Log out of your Atomi Smart account.
2. After logging out, press ‘Sign Up’ and from the drop-down menu, choose ‘United Kingdom’ even if you are located in US/Canada.
3. You will then have to enter another email address to create a new account that you have NOT previously used with the Atomi Smart app in order to continue.
4. Once entering the new email address, you will then click the checkbox next to ‘I Agree’ and click on ‘Get Verification Code’ in order to complete the creation of your new account.
5. After creating your new account, try connecting the coffee maker again.
Introduction
Overview
The Atomi Smart Coffee Maker lets you brew your next cup of coffee from your phone anytime, anywhere! Set weekly schedules, turn your Smart Coffee Maker on and off automatically, and much more.

Cleaning your Smart Coffee Maker before first use
Make sure your first cup of coffee is as good as it can be by cleaning your Smart Coffee Maker before its first use. Just follow these simple steps:
1. Wash the carafe, carafe lid, and the filter basket in a mixture of mild detergent and water. Rinse each thoroughly.
2. Run a brew cycle with water only, without adding coffee and coffee filter.
3. When brewing is complete, turn your Smart Coffee Maker off, discard the water in the carafe and rinse the carafe, lid, and filter basket.
Before you begin
1. Know your Wi-Fi network and password
2. Make sure your mobile device is running iOS® 8 or higher or Android™ 4.1× or higher
3. Make sure you’re connected to a 2.4GHz Wi-Fi network (Atomi Smart can’t connect to 5GHz networks).
Connecting Your Device
Step 1: Download App
Download the Atomi Smart app from the App Store or Google Play and create an account. If you already have the app installed, please make sure to check for any updates as they will improve your experience with the Atomi Smart app.
Step 2: Plug In

Plug your Atomi Smart Coffee Maker into any standard outlet.
Step 3: Add Device

1. Confirm that the Wi-Fi indicator on the LCD panel is flashing. If not, press and hold the Power button for 10 seconds or unplug and plug the coffee maker again.
2. Select “Add Device” or click (+) at the top right corner of the screen.
3. Choose “Smart Coffee Maker” from the device list.
Step 4: Connecting to Wi-Fi
1. Enter your Wi-Fi network and password. Press ‘Continue’.
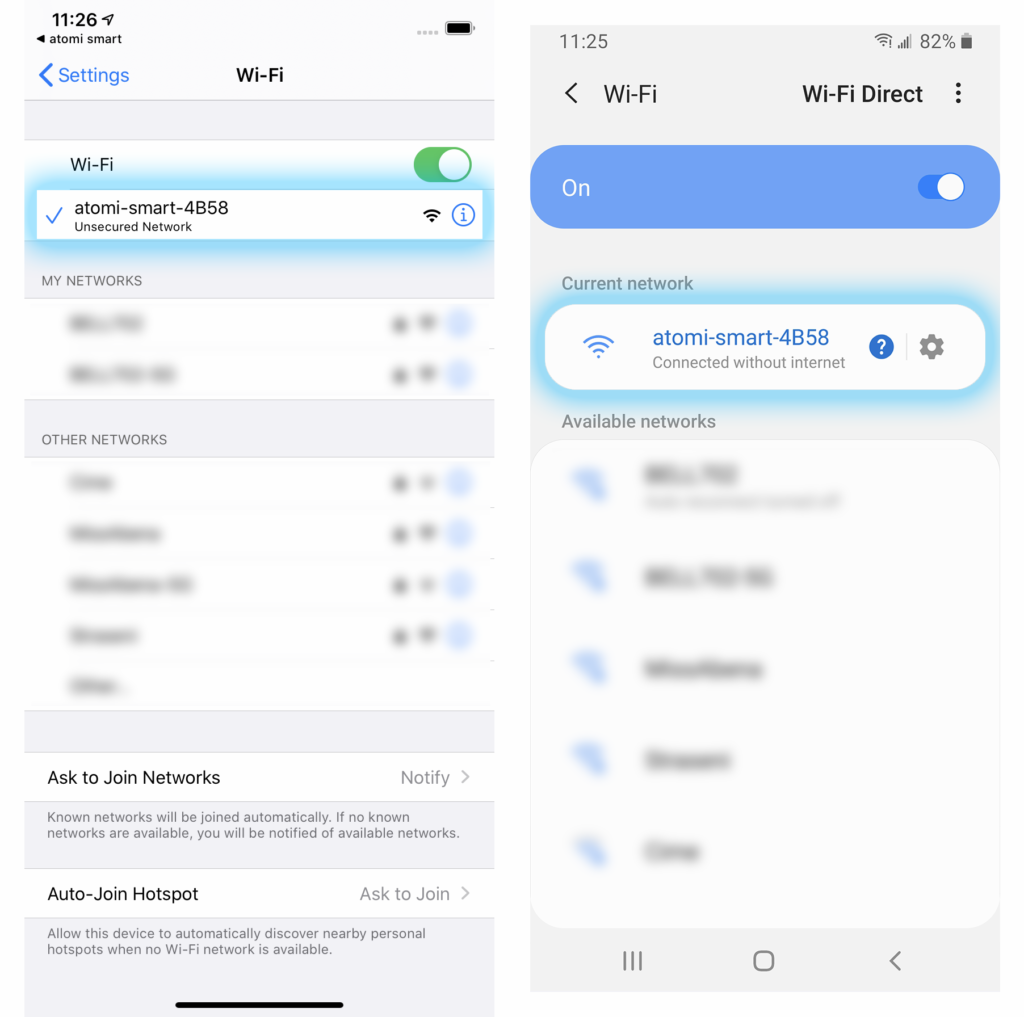
2. Press ‘Go to Connect’. On your phone’s Wi-Fi screen, select ‘atomi-smart-xxxx’
3. Once it connects, return to the Atomi Smart app.
4. Your device is now connected.
For iOS: After connecting to the atomi-smart-xxxx, return to the app by pressing ‘Atomi Smart’ on the top left part of the screen, or by switching back to the Atomi Smart window
For Android: After connecting to the atomi-smart-xxxx, some devices may display a message informing that you are “Connected without internet”. Please ignore this message and return to the app by pressing the back button on the bottom navigation bar (Do not press the back button on the top left part of the screen as this may bring you back to the ‘Settings’ page instead of the Atomi Smart app)
IMPORTANT: If you cannot see the ‘atomi-smart-xxxx’, press and hold the Power button again for another 10 seconds and refresh your Wi-Fi list. The ‘atomi-smart-xxxx’ network should appear after a few seconds.
Controlling your Smart Coffee Maker
General

Brew – Start/Stop brewing
Regular – Set it to Regular brew strength
Strong – Set it to Strong brew strength
Schedule – Set a brewing schedule
Clock – Adjust and set the time
Schedule

Enable this Schedule? – Confirms that the schedule is enabled or not.
Mode – Set the schedule to turn On or Off the device.
Regular/Strong – Select between Regular or Strong mode.
Time – Set the desired time of the day to start brewing.
Repeat – Select the days of the week that this schedule should repeat.
For more scheduling options, you can use the ‘Smart Scenes’ feature which allows you to create additional schedules, triggers and automations.
1 – Open the Atomi Smart app
2 – Select the ‘Smart Scenes’ tab and press the ‘+’ button
3 – Select ‘Schedule’, enter the time/days of the week to repeat and press ‘Continue’
4 – Press ‘Execute Device Action’ and select your Coffee Maker. Choose the actions for the schedule (Example: Power ON, Brew Strength Strong) and press ‘Continue’
5 – Review your schedule, enter a name (optional) and press ‘Save’.
You can create additional schedules for your coffee maker by repeating the steps above.
For more ‘Smart Scenes’ instructions visit Triggers & Automations
Tip: The Atomi Smart Coffee Maker will keep your coffee warm for up to 4 hours.
You can also customize and set it to keep the coffee warm for a shorter period by following the steps below:
- Open the Atomi Smart app and press the ‘Smart Scenes’ tab
- Press the ‘+’ button and select ‘Device Status’
- Select your Coffee Maker, then press ‘Status’ and choose ‘Keeping Warm’
- Now press the ‘+’ button on the ‘Then’ section and select ‘Set next Action in’
- Enter the amount of hours/minutes (less than 4 hours) that you want the coffee maker to stay in “Keeping Warm’ mode. Then, press ‘Continue’
- Now press again the ‘+’ button on the ‘Then’ section and select ‘Execute Device Action’
- Select your Coffee Maker, then press ‘Power’ and choose ‘Off’. Press ‘Save’ and ‘Continue’
- Review your Automation details and press ‘Save’
Clock

Synchronize your phone’s clock to the Coffee Maker
Measuring your Coffee
For best results, use a level tablespoon for ground coffee measurement. Make sure you use medium grind coffee for a perfect brew.

Adding Water and Ground Coffee:
1 – Open the top lid of the Smart Coffee Maker.
2 – Place a 10-12 cup paper basket-style filter or the included reusable filter into the removable filter basket.
Note: If using paper filters, it is important that the sides of the filter fit flush against the side of the filter basket. If filter collapse occurs, dampen the filter before placing it in the filter basket. Add the desired amount of coffee and gently shake to level the coffee.
3 – Fill the water reservoir with cold, fresh water to the desired capacity. For easy and accurate filling, the water markings on the water reservoir show the amount of water needed to make the corresponding desired number of cups. Do not fill past the “12 cup MAX line” or water will flow out of the Smart Coffee Maker.
Note: The amount of coffee brewed will always be slightly less than the amount of water poured into the water reservoir. This is due to the absorption of water by the coffee grounds.
Using your Smart Coffee Maker without the Atomi Smart app
1 – After completing the steps in the Adding Water and Ground Coffee section and with the carafe and the filter basket securely in place, turn the Smart Coffee Maker on by pressing the POWER button once. The POWER button icon will turn on (Red) to signal that the Smart Coffee Maker is on and brewing.
Note: Brew can be stopped by pressing the POWER button a second time.
2 – After the used coffee grounds have cooled, carefully remove the filter basket and discard them.
Note: The brew basket drawer is hot after brewing. Always allow the Smart Coffee Maker to cool down before cleaning.
3 – Make sure the Glass Coffee Carafe is empty and in place before starting to brew coffee.
4 – Be sure to turn your Smart Coffee Maker off when no longer using it.
Cleaning and Maintaining your Smart Coffee Maker
Daily Cleaning – Always unplug the Smart Coffee Maker and allow it to cool before cleaning.
- Remove and wash the filter basket, permanent filter, carafe and carafe lid in a solution of hot water and mild liquid soap.
- Never use abrasive cleaners, steel wool pads or other abrasive materials.
- CAUTION: Never immerse the Smart Coffee Maker itself in water, in any other liquid or place the machine in the dishwasher.
1 – Fill the carafe with a solution of equal parts water and vinegar and let the solution stand in the carafe for approximately 20 minutes.
2. Discard the solution, then wash and rinse the carafe. Do not use harsh abrasive cleaners that may scratch the carafe.
The glass carafe is dishwasher safe ✓
FAQ & Troubleshooting
The Atomi Smart Coffee Maker will keep your coffee warm for up to 4 hours.
You can also customize and set it to keep the coffee warm for a shorter period by following the steps below:
- Open the Atomi Smart app and press the ‘Smart Scenes’ tab
- Press the ‘+’ button and select ‘Device Status’
- Select your Coffee Maker, then press ‘Status’ and choose ‘Keeping Warm’
- Now press ‘Set next Action in’ and enter the amount of hours/minutes (less than 4 hours) that you want the coffee maker to stay in “Keeping Warm’ mode. Then, press ‘Continue’
- Now press the ‘+’ button on the ‘Action’ section and select ‘Execute Device Action’
- Select your Coffee Maker, then press ‘Power’ and choose ‘Off’. Press ‘Save’ and ‘Continue’
- Review your Automation details and press ‘Save’
Alexa
“Alexa, turn on [device name]”
“Alexa, turn off [device name]”
“Alexa, set the [device name] to regular”
“Alexa, set the [device name] to strong”
“Alexa, what is the [device name] brew strength?“
“Alexa, brew coffee” (Requires additional steps. Please see below)
- Open the following link: alexa.amazon.com/routines/shared/CUHPr9u3T726XS3VDQ-STg – *If you are viewing this on a Desktop/Laptop you will need to scan the QR code and tap on the notification that appears on your phone
- You will be redirected to the Amazon Alexa app. Press ‘View Routine’
- Press ‘Smart Home Device’, then ‘All Devices’ and select your Coffee Maker
- Confirm that “Power On” is enabled (Tip: You can also set your desired brew strength). Press ‘Next’ and ‘Save’
- Now when you say “Alexa, brew coffee”, your Coffee Maker will start brewing
Google Assistant
“Hey Google, turn on [device name]”
“Hey Google, turn off [device name]”
“Hey, Google, what is the [device name] status?”
The Atomi Smart app allows you to share control of the coffee maker with other household members. Please click here to learn more about device/group sharing.
– In order to disable all app notifications, follow the steps below:
`1. Open the Atomi Smart app
2. Select ‘Me’
3. Press ‘Settings’
4. Select ‘App Notification’ and turn off the ‘Enable Notifications’ switch
– Alternatively, you can disable notifications just for the Coffee Maker (and keep all other app notifications) by following the steps below:
1. Open the Atomi Smart app
2. Select ‘Me’
3. Press ‘Settings’
4. Select ‘App Notification’ > ‘Do-Not-Disturb Schedule’ > ‘Add schedule’
5. Now press ‘Do-Not-Disturb Device’, select your ‘Coffee Maker’ and press the ‘Back’ button
6. Enter the time/day of the week that you want the Coffee Maker notifications to be disabled. Press ‘Save’ 7. Finally, turn on the ‘Do-Not-Disturb Schedule’ switch
Press and hold the ‘Brew Strength’ button (beans icon) for 3 seconds on the coffee maker panel. You will hear a beep to indicate that the beep was disabled.
In order to enable it, press and how the ‘Brew Strength’ button (beans icon) again for 3 seconds.
Make that the carafe is correctly placed on the hot plate. Also, confirm that the water tank has at least 2 cups of water.
If you are having issues connecting your Coffee Maker, please follow the steps below:
1. Log out of your Atomi Smart account.
2. After logging out, press ‘Sign Up’ and from the drop-down menu, choose ‘United Kingdom’
3. You will then have to enter another email address to create a new account that you have NOT previously used with the Atomi Smart app in order to continue.
4. Once entering the new email address, you will then click the checkbox next to ‘I Agree’ and click on ‘Get Verification Code’ in order to complete the creation of your new account.
5. After creating your new account, try connecting the coffee maker again.
If above didn’t work, please confirm the information below:
In order to successfully connect Atomi Smart devices, a 2.4GHz connection is required.
The 2.4GHz frequency waves travel further than the 5GHz. This means that if your device is in another room or far from your phone, you will have a better signal reception (compared to 5Ghz) which is essential for your smart device to function correctly and stay online.
All modern routers come with 2.4GHz and 5GHz. Depending on your router type, these bands may appear as separate WiFi networks (Example: Name-2.4GHz and Name-5GHz) or combined. If you only have one WiFi network, you should still be able to connect since the Atomi Smart app automatically finds the 2.4GHz frequency when connecting to your router.
However, if you experience any issues, please follow the points below:
– Make sure that you are connecting to a 2.4GHz network
– Keep your mobile device close to the router during connection
– If you have two SSID for your WiFi (Example: Name-2.4GHz / Name-5GHz), please temporarily disable “Auto-Join” on your Name-5GHz network)
– If you have two SSID for your WiFi, make sure that your 2.4GHz and 5GHz WiFi have different names
– If your router gives the option to disable the 5GHz network, please disable it temporarily
– Disable any VPN apps/services in order to connect successfully
– If you are having issues to connect, turn on Airplane Mode (Keep only WiFi activated when connecting your smart device)
– Make sure that you’ve entered the correct password for your 2.4GHz WiFi on the “Select 2.4GHz Wi-Fi Network” screen (Case sensitive, and make sure that there are no extra spaces)
– If you have too many devices connected to your 2.4GHz (more than 10), please turn off some of them temporarily and retry connecting your smart device to the app
– If you have a Mesh router, you may not be able to manually switch to a 2.4GHz frequency. Since this frequency travels further than the 5GHz, you can force your device to connect to it by moving your phone far from the router
– If you are still experiencing issues to connect, delete the app and reinstall it
– If the issue persists, restart your router
Visit the Connection Troubleshooting page for more information
Make sure your Atomi Smart device is plugged in and the Wi-Fi indicator is blinking on the LCD screen. If not, unplug your Atomi Smart device and plug it back in to reboot. If you still cannot see the ‘atomi-smart-xxxx’, press and hold the Power button for 10 seconds.
Use your smart phone to confirm that you have at least two Wi-Fi bars in the vicinity of your Atomi Smart device. If not, move your Atomi Smart device closer to your router. (The list will refresh every 10 seconds).
Refresh the device list.
Force quit and re-launch the Atomi Smart app.
Press and hold the Power butt on for 10 seconds. The WiFi indicator on the LCD panel should start flashing.
– The Smart Coffee Maker is unplugged. Plug the Smart Coffee Maker back into the wall outlet.
– Carafe is not placed all the way on the warming plate; place the carafe correctly on the warming plate.
Yes, the Atomi Smart Coffee Maker works with Alexa and Google Assistant.
1. The Smart Coffee Maker is unplugged; plug the Smart Coffee Maker back into the wall outlet.
2. There’s a power outage; wait for power to be restored.
3. The filter basket is not properly inserted; insert filter basket correctly.
4. Carafe is not placed all the way on the warming plate; place carafe correctly on the warming plate.
There are no coffee grounds in the filter basket; add the desired amount of coffee to the filter.
The filter is not properly placed in the basket. Seat the filter properly within the filter basket.
The Atomi Smart Coffee Maker user guide is available here
Still have questions?
Create a ticket on our Support page. Our team is available to help, Monday through Friday, 9am to 5pm (EST)